[LocalStack] LocalStack에서 Simple Email Service를 사용해보자.
목차
개요
이메일 전송 기능 개발을 가정해보자. AWS를 사용한다면 SES(Simple Email Sevice)를 사용할 수 있을 것이다.
SES를 사용하려면 이메일 인증 절차가 필요한데 오래걸리진 않지만 번거롭다. 또한 인프라와 개발을 분담해야하는 경우 개발하는 쪽에서 인프라가 준비될때까지 해당 기능을 계속 미뤄둬야할까? 이러한 상황에서 LocalStack을 사용하면 해당 기능의 뼈대가 되는 코드를 미리 작업할 수 있을 것이다. 또한 AWS의 비용 지출을 잠시 신경쓰지 않아도된다.
각설하고 LocalStack의 SES를 사용하는 방법을 알아보자.
LocalStack SES 송신메일 설정하기
LocalStack에서 SES를 사용하기 위해서는 다음과 같은 명령어를 통해 송신 이메일만 설정해주면된다.
$ awslocal ses verify-email-identity --email hello@example.com
송신 이메일을 “hello@example.com”으로 설정하는 명령어이며 성공한 경우 https://app.localstack.cloud/에서 다음과 같이 등록된 송신 이메일을 확인할 수 있게된다.

Boto3를 이용해 메일 전송 테스트하기
boto3를 이용해 email을 전송하기 전 endpoint_url을 localstack의 url로 설정해주자.
ses_client = boto3.client(
    "ses",
    endpoint_url="<http://127.0.0.1:4566>"
)
이제 send_email을 통해 메일을 전송하자.
body_text = 'This is a test email sent from AWS SES using Boto3.'
body_html = '<html><body><h1>This is a test email sent from AWS SES using Boto3.</h1></body></html>'

response = ses_client.send_email(
    Source="hello@example.com",
    Destination={"ToAddresses": ['recipient@example.com']},
    Message={
        'Subject': {'Data': 'Test Email from AWS SES'},
        'Body': {
            'Text': {'Data': body_text},
            'Html': {'Data': body_html}
        }
    }
)
실제로 메일이 발송되진 않는다. 그러나 성공한 경우 AWS-SES을 메일 성공 Response와 동일한 데이터를 받는다.
{'MessageId': 'ywafzsjookvymenc-trtowsfg-gvvy-chfw-vvqh-sphdnnqgqzly-mqryfv',
 'ResponseMetadata': {'HTTPHeaders': {'connection': 'close',
                                      'content-length': '341',
                                      'content-type': 'text/xml',
                                      'date': 'Sun, 28 Apr 2024 13:02:58 GMT',
                                      'server': 'hypercorn-h11'},
                      'HTTPStatusCode': 200,
                      'RequestId': '67c23670-00af-48ff-85e8-4fe21b03046a',
                      'RetryAttempts': 0}}
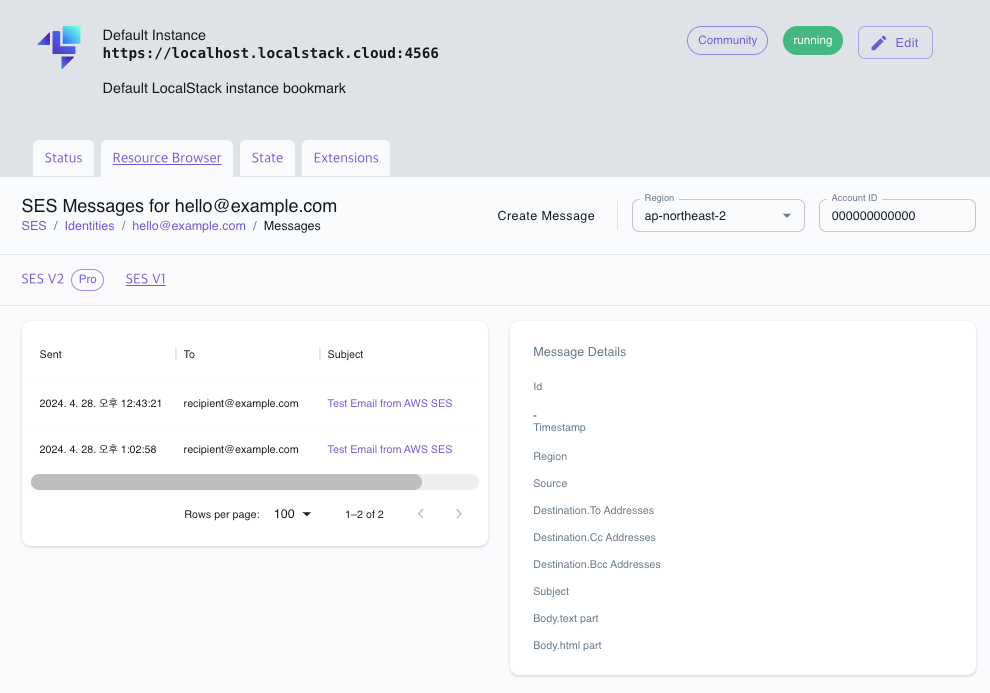
이후 https://app.localstack.cloud/에서 “hello@example.com”의 상세페이지를 통해 전송한 메일 내역을 확인할 수 있다.
API로 접근하기
LocalStack이 제공하는 API를 통해서도 데이터를 관리할 수 있다.
송신 내역 읽어오기
LocalStack의 문서를 보니 다음과 같은 API를 사용해 특정 이메일의 송신내역을 가져올 수 있는 기능이 제공되는듯 보인다.
curl --silent localhost.localstack.cloud:4566/_aws/ses?email=hello@example.com | jq .
그러나 나는 위와 같이 했을때 데이터를 읽어오진 못했고 대신 사용법을 다음과 같이 변경했더니 가능했다.
curl -XGET localhost.localstack.cloud:4566/_aws/ses -d '{"query":{"email":"hello@example.com"}}' | jq
{
  "messages": [
    {
      "Id": "hlgyscnodhyeyebg-vlsmyouf-ndaa-wqan-vfin-kdebsbwywfig-zvuttb",
      "Region": "ap-northeast-2",
      "Destination": {
        "ToAddresses": [
          "recipient@example.com"
        ]
      },
      "Source": "hello@example.com",
      "Subject": "Test Email from AWS SES",
      "Body": {
        "text_part": "This is a test email sent from AWS SES using Boto3.",
        "html_part": "<html><body><h1>This is a test email sent from AWS SES using Boto3.</h1></body></html>"
      },
      "Timestamp": "2024-04-28T12:43:21"
    },
    {
      "Id": "ywafzsjookvymenc-trtowsfg-gvvy-chfw-vvqh-sphdnnqgqzly-mqryfv",
      "Region": "ap-northeast-2",
      "Destination": {
        "ToAddresses": [
          "recipient@example.com"
        ]
      },
      "Source": "hello@example.com",
      "Subject": "Test Email from AWS SES",
      "Body": {
        "text_part": "This is a test email sent from AWS SES using Boto3.",
        "html_part": "<html><body><h1>This is a test email sent from AWS SES using Boto3.</h1></body></html>"
      },
      "Timestamp": "2024-04-28T13:02:58"
    }
  ]
}
송신 내역 삭제하기
curl의 DELETE를 이용하면 특정 송신내역을 삭제하는 것도 가능하다.
curl -X DELETE <http://127.0.0.1:4566/_aws/ses\\?id\\=jqhxcboaoncdvjqk-ftjiibya-hbcb-zrow-nfsh-mwyhnpnpehgc-qxlnuc>
LocalStack SES의 한계
위에 기술된 LocalStack의 SES는 SES V1을 기준으로 하는 것이다. 유료 플랜을 결제하면 SES V2를 사용할 수 있고 SMTP를 연동하여 실제 이메일 전송도 할 수 있는 것으로 보인다.
만약 SES V2를 대상으로 메일 전송 코드를 만들어야 한다면 https://github.com/domdomegg/aws-ses-v2-local 를 사용하는 것도 고려해보자. aws-ses-v2-local에서는 SMTP를 설정해 실제 메일을 발송하는 것도 가능하다.
SESv2에서는 SESv1에서 제공되지 않는 기능도 존재하니 관심이 있다면 따로 찾아보자.
마치며
테스트하고 싶었던 기능 중 한가지는 송신된 이메일이 수신측에서 열어봤는지를 체크할 수 있는가였다. AWS-SES 개발자 문서에는 이 기능이 구현 가능한것처럼 설명되어 있어 LocalStack을 통해 검증이 가능한지 싶었는데 해당 기능은 SESv2에서 가능했다.
LocalStack을 결제하지 않고 사용할 예정이라 해당 기능을 따로 검증할 수 있는 방법을 생각해봐야겠다.