
목차
개요
6월에 유튜브를 보던 도중 Seleinum으로 Proxy를 사용하던 하나의 영상을 보게 되었습니다. 원래 Seleinum으로 Proxy를 사용하는 방법은 6월의 ToDoList 중 하나였는데 이제야 조사를 마쳐서 글을 쓰게 되었습니다.
아마 이 글의 제목을 보고 이 글을 읽으려고 하시는 분들은 Proxy를 적어도 한 번 들어봤거나 이미 알고 계신 분 들일 것이라 조심스레 유추해 봅니다. 그러하여 Proxy에 대한 이론이나 원리를 자세하게 정리한다기보다 글의 제목처럼 Selenium에서 proxy를 사용하는 방법과 나아가 Mac에서 Seleinum을 통해 Tor를 이용하는 방법을 기술하려고 합니다.
요약하자면 제가 Python으로 Selenium에서 Proxy를 써보고 어떻게 사용했는지 그리고 이를 이용하여 Mac에서 Selenium을 이용해 Tor를 어떻게 사용했는지를 남기는 포스팅입니다.
Proxy가 뭔데?
Proxy는 간단히 말해 중개서버입니다. 더 이상 무슨 설명이 필요할까 싶습니다만. 조금 더 구체적으로 이 글에서 설명되는 Proxy는 Forward Proxy에 대한 개념에 해당하는 내용입니다. Proxy라는 키워드를 생각하면 떠올려지는 그 Proxy입니다.
즉, “클라이언트가 요청을 대신하여 인터넷 리소스에 접근하고 해당 응답을 클라이언트로 전달” 한다고 할 수 있겠습니다.
Selenium에서 Proxy 사용하기
어떻게 사용하나?
사실 Selenium으로 Proxy를 사용하는 방법은 아주 쉽습니다. selenium에서 Options 객체를 통해 add_argument에 proxy-server를 지정해주면 됩니다.
from selenium.webdriver.chrome.options import Options

options = Options()
options.add_argument("--proxy-server=PROXY_IP:PROXY_PORT")
그리고 webdriver.Chrome 객체를 초기화 할 때 이 options instance를 넘겨주기만 하면됩니다.
from selenium import webdriver
from selenium.webdriver.chrome.service import Service as ChromeService
from webdriver_manager.chrome import ChromeDriverManager

driver = webdriver.Chrome(
    service=ChromeService(ChromeDriverManager().install()),
    options=options
)
확인해보자.
위에서 작성한 코드가 실제로 Proxy를 통해 인터넷에 접근하는지 체크해봅시다. 우선 Proxy를 사용하기 전 현재 공인 IP를 체크해봅시다. 공인 IP를 체크하는 사이트 많이 존재하는데 저는 https://dnsleaktest.com/를 사용했습니다.

Proxy를 이용하기 위해선 당연히 Proxy Server를 알아야됩니다. 이 또한 공개된 Proxy Server들이 있으니 참고하길 바랍니다. 저는 미국 Proxy Server를 이용하여 진행했습니다. 주의할점은 Proxy Server들을 보실 때 해당 Proxy Server가 HTTP나 HTTPS를 지원하는지 체크합시다.
# Proxy Test...
option = Options()
option.add_argument("--proxy-server=142.147.XXX.XXX:8080")

driver = webdriver.Chrome(
    service=ChromeService(ChromeDriverManager().install()),
    options=option
)
driver.get("<https://dnsleaktest.com/>")

time.sleep(5)
driver.quit()
결과는 다음과 같습니다

Proxy 서버 대신 사용하는 Tor 네트워크
혹시 “Tor 네트워크”를 들어보셨나요? 흔히 다크웹이나 딥웹이라고 알려져 있는 것 같은데 Tor 네트워크는 익명성을 보장하는 네트워크일 뿐입니다.
이 글에서 Tor를 언급하는 이유는 Tor 네트워크를 이용하면 Proxy Server를 찾아서 연결할 필요가 없기 때문입니다. 대신 로컬에 설치된 Tor Binary&Browser 를 통해 Proxy를 사용하는 효과를 취할 수 있습니다. (물론 사용목적에 따라 다를 수 있습니다)
공수로 따지면 Tor Network를 이용하는 것이 공개된 Proxy 서버를 찾아 사용하는 것보다 셋팅이 더 필요한 작업이긴 합니다만 공개된 Proxy Server를 사용하는 것은 안전하지 못할 수 있기 때문에 앞서 언급했듯 안정성을 고려하는 경우 Tor Network를 이용하는 것이 공개 Proxy Server를 대체하는 선택지 중 하나이기도 합니다.
TbSeleinum과 Tor Network
이러한 TorNetwork를 이용하기 위해 Python에서는 tbselenium이라는 라이브러리가 존재합니다. tbselenium 은 Tor Package가 설치되어있다면 이 Package를 기준으로 TorNetwork에 접속할 수 있게 도와주며 selenium을 기저로 동작합니다.
과거에는 ubuntu에서 tbseleinum을 사용해본적이 있었기 때문에 다시 tbselenium을 mac에서 사용해보고자 했는데 어째선지 동작이 잘 되지는 않더군요 tbselenium 내부 코드를 탐색해보니 linux에 더 최적화된 형태였습니다.
즉, Mac에서는 selenium을 통해 TorNetwork를 사용하는 방법이 없는지 싶었습니다.
Mac에서 TorNetwork를 사용하기 위한 아이디어
결론부터 말하자면 Mac에서 Tor Network를 이용하기 위해 조금 다른 방식을 취해야했습니다. 그렇게 결론이 난 과정에는 기존의 tbseleinum이 돌아가는 구조를 살펴보고 이를 Mac에서 차용하기엔 다소 무리가 있다는 것이었습니다.
Linux에서의 tbseleinum
먼저 linux에서 tbseleinum을 사용하는 방식을 생각해봐야했습니다.
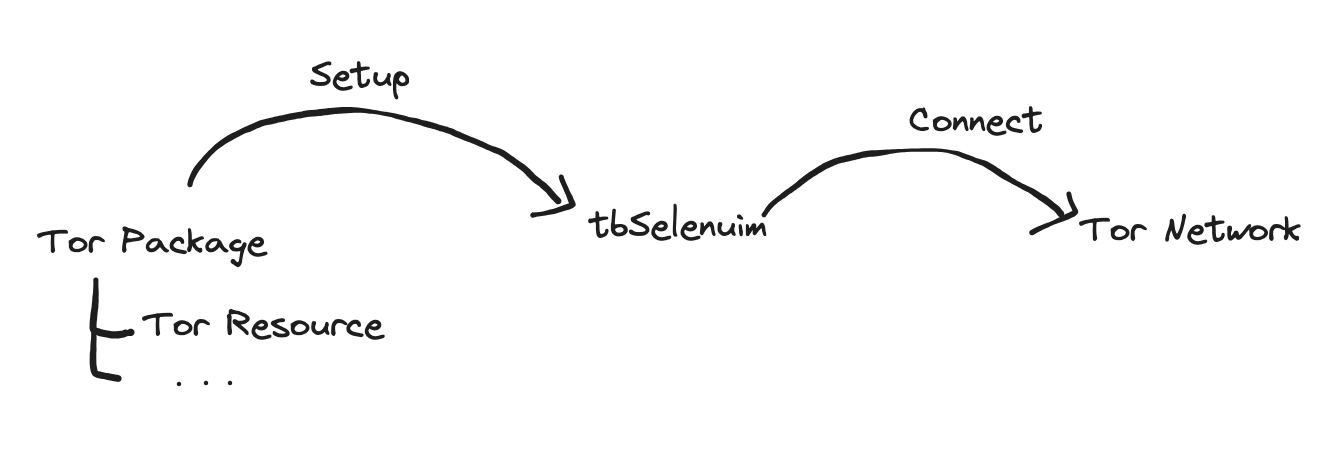
tbselenium을 이용하려면 Tor가 설치된 경로를 먼저 셋팅해줘야하고 이 셋팅을 통해 Tor Network를 사용할 수 있는 구조입니다. 간단히 말해 미리 설치된 Tor Resource를 tbseleinum은 이용만 하는 것입니다.
앞서 언급했듯 tbselenium은 내부적으로 linux 환경에 최적화된 형태이기 떄문에 Mac에서 Tor Package를 설치하여 tbselenium에 맞춰 변경하려면 무리가 있기 때문입니다.
Mac에서 TorNetwork 이용하는 방법에 대한 구상
Mac에서 tbseleinum을 이용할 수 없는 상황이다보니 “그냥 Tor Binary 자체를 이용할 수 있나?”를 떠올리게 되었습니다. 간단한 구상은 다음과 같았습니다.
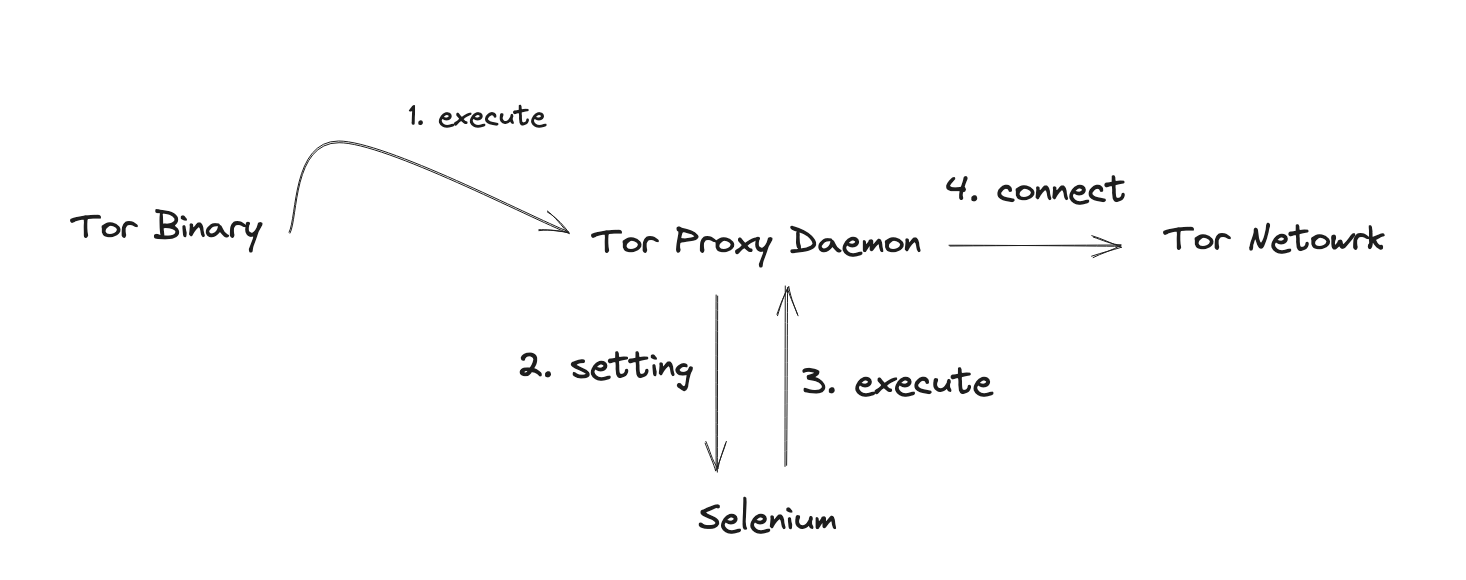
Tor Network에 접속할 수 있는 어떤 Tor Binary를 실행시키면 Tor Proxy에 접근할 수 있는 정보를 얻을 수 있을 것이고 이 정보를 seleinum에서 이용해 Tor Network를 이용해보자는 것이 주요 골자였습니다.
그리하여 정확히 위 구상과 비슷한 방식으로 Mac 에서 Tor Binary를 이용하여 Tor Network를 이용할 수 있었습니다.
그래서 어떻게?
이제 구상한대로 Mac에서 Selenium으로 TorNetwork를 이용하기 위한 과정입니다.
설치하기
우선 brew를 이용하여 tor를 설치할 수 있었습니다.
$ brew install tor
설치된 tor를 실행하면 다음과 같은 결과가 나옵니다.
╭─jako@prompt-mini /opt/homebrew/etc/tor ‹stable›
╰─$ tor
Jul 09 00:59:21.145 [notice] Tor 0.4.7.13 running on Darwin with Libevent 2.1.12-stable, OpenSSL 3.1.1, Zlib 1.2.11, Liblzma N/A, Libzstd N/A and Unknown N/A as libc.
Jul 09 00:59:21.145 [notice] Tor can't help you if you use it wrong! Learn how to be safe at <https://support.torproject.org/faq/staying-anonymous/>
Jul 09 00:59:21.145 [notice] Read configuration file "/opt/homebrew/etc/tor/torrc".
Jul 09 00:59:21.149 [notice] Opening Socks listener on 127.0.0.1:9050
Jul 09 00:59:21.150 [notice] Opened Socks listener connection (ready) on 127.0.0.1:9050
Jul 09 00:59:21.000 [notice] Parsing GEOIP IPv4 file /opt/homebrew/Cellar/tor/0.4.7.13_1/share/tor/geoip.
Jul 09 00:59:21.000 [notice] Parsing GEOIP IPv6 file /opt/homebrew/Cellar/tor/0.4.7.13_1/share/tor/geoip6.
Jul 09 00:59:21.000 [notice] Bootstrapped 0% (starting): Starting
Jul 09 00:59:21.000 [notice] Starting with guard context "default"
Jul 09 00:59:22.000 [notice] Bootstrapped 5% (conn): Connecting to a relay
Jul 09 00:59:22.000 [notice] Bootstrapped 10% (conn_done): Connected to a relay
Jul 09 00:59:23.000 [notice] Bootstrapped 14% (handshake): Handshaking with a relay
Jul 09 00:59:23.000 [notice] Bootstrapped 15% (handshake_done): Handshake with a relay done
Jul 09 00:59:23.000 [notice] Bootstrapped 75% (enough_dirinfo): Loaded enough directory info to build circuits
Jul 09 00:59:23.000 [notice] Bootstrapped 90% (ap_handshake_done): Handshake finished with a relay to build circuits
Jul 09 00:59:23.000 [notice] Bootstrapped 95% (circuit_create): Establishing a Tor circuit
Jul 09 00:59:25.000 [notice] Bootstrapped 100% (done): Done
실행하기
shell에 나온 정보대로 앞서 설명드렸던 selenium code에 tor 정보를 입력해봅시다.
option = Options()
option.add_argument("--proxy-server=127.0.0.1:9050")

driver = webdriver.Chrome(
    service=ChromeService(ChromeDriverManager().install()),
    options=option,
)

driver.get("<https://dnsleaktest.com/>")
time.sleep(4)
driver.quit()
그런데 이 코드를 실행하면 seleinum 코드에서는 아래 error message를
selenium.common.exceptions.WebDriverException: Message: unknown error: net::ERR_TUNNEL_CONNECTION_FAILED
  (Session info: chrome=114.0.5735.198)
shell에서는 다음 error message를 뱉어냅니다.
Jul 09 01:00:49.000 [warn] Socks version 67 not recognized. (This port is not an HTTP proxy; did you want to use HTTPTunnelPort?)
실행에 실패했습니다.
왜 실패했지?
왜 실패했는지를 자세히 생각해보면 tor를 실행한경우 9050 port는 http proxy를 위한 용도가 아닌 sock proxy를 사용하기 위한 용도이기 때문입니다. 이는 처음 tor를 실행시킬 때 나오는 message 잘 읽어보면 나오는 내용입니다.
torrc와 HttpTunnel ?
이 문제를 해결하기 위해 HttpTunnelPort와 관련된 무언가를 검색해볼 필요가 있었습니다. 해결방법은 torrc라는 환경설정파일을 통해 HttpTunnelPort를 설정해주면 됩니다. 저의 경우 torrc가 설치된 경로는 다음과 같았습니다.
/opt/homebrew/etc/tor/
tor를 최초 설치한 경우 torrc가 아닌 torrc.sample 파일이 존재할 것입니다.
╭─jako@prompt-mini /opt/homebrew/etc/tor ‹stable›
╰─$ ls
torrc.sample
이제 torrc 파일을 만들어 HttpTunnelPort를 적어줍시다.
# torrc
HTTPTunnelPort 9080
이제 다시 tor를 실행시킵시다.
╰─$ tor -f /opt/homebrew/etc/tor/torrc                                                                                         130 ↵
Jul 09 01:16:36.006 [notice] Tor 0.4.7.13 running on Darwin with Libevent 2.1.12-stable, OpenSSL 3.1.1, Zlib 1.2.11, Liblzma N/A, Libzstd N/A and Unknown N/A as libc.
Jul 09 01:16:36.006 [notice] Tor can't help you if you use it wrong! Learn how to be safe at <https://support.torproject.org/faq/staying-anonymous/>
Jul 09 01:16:36.006 [notice] Read configuration file "/opt/homebrew/etc/tor/torrc".
Jul 09 01:16:36.009 [notice] Opening Socks listener on 127.0.0.1:9050
Jul 09 01:16:36.009 [notice] Opened Socks listener connection (ready) on 127.0.0.1:9050
**Jul 09 01:16:36.009 [notice] Opening HTTP tunnel listener on 127.0.0.1:9080**
Jul 09 01:16:36.009 [notice] Opened HTTP tunnel listener connection (ready) on 127.0.0.1:9080
Jul 09 01:16:36.000 [notice] Parsing GEOIP IPv4 file /opt/homebrew/Cellar/tor/0.4.7.13_1/share/tor/geoip.
Jul 09 01:16:36.000 [notice] Parsing GEOIP IPv6 file /opt/homebrew/Cellar/tor/0.4.7.13_1/share/tor/geoip6.
Jul 09 01:16:36.000 [notice] Bootstrapped 0% (starting): Starting
Jul 09 01:16:36.000 [notice] Starting with guard context "default"
Jul 09 01:16:37.000 [notice] Bootstrapped 5% (conn): Connecting to a relay
Jul 09 01:16:37.000 [notice] Bootstrapped 10% (conn_done): Connected to a relay
Jul 09 01:16:37.000 [notice] Bootstrapped 14% (handshake): Handshaking with a relay
Jul 09 01:16:38.000 [notice] Bootstrapped 15% (handshake_done): Handshake with a relay done
Jul 09 01:16:38.000 [notice] Bootstrapped 75% (enough_dirinfo): Loaded enough directory info to build circuits
Jul 09 01:16:38.000 [notice] Bootstrapped 90% (ap_handshake_done): Handshake finished with a relay to build circuits
Jul 09 01:16:38.000 [notice] Bootstrapped 95% (circuit_create): Establishing a Tor circuit
Jul 09 01:16:40.000 [notice] Bootstrapped 100% (done): Done
이전에 없었던 “Opening HTTP Tunnel listner on 127.0.0.1:9080” 메시지가 보입니다.
IP가 변경되는지 확인해보자
이제 설정한 정보대로 코드를 다시 변경합시다.
option.add_argument("--proxy-server=127.0.0.1:9080")
이제 tor binary를 재시작하고 코드를 실행시킬때마다 IP가 계속 변경되는 걸 확인할 수 있습니다.
맺음말
과거에 한번 시도했던 내용을 잘 정리하지 않았습니다. 코드만 백업했기에 그대로 사용하면 동작될거라 생각했기 때문이었죠.
환경이 바뀌고 다시 실행해보니 동작이 되지 않던 것을 다시 조사하게되는 과정에서 새로운 아이디어를 떠올리는 과정의 삽질을 거치고나니 재미있었던 주제였습니다.
'Language > Python' 카테고리의 다른 글
| dictionary를 dataclass로 만들고 다시 class로 정의하기 (0) | 2023.09.17 |
|---|---|
| [SQLAlchemy] SQL Compilation Caching (0) | 2023.08.13 |
| pytest-django에서 view에 request 던지기 (2) | 2023.06.18 |
| setuptools를 활용한 프로젝트 패키징 (1) | 2023.06.18 |
| 함수에 적용되어있는 decorator를 알아내는 방법 (0) | 2023.05.05 |


